Most golfers struggle with inconsistent drives like sky balls or thin shots because they follow a generic « half-ball above the crown » rule. The reality is that optimal tee height is a personal variable, not a universal constant. This guide will show you how to stop guessing and start diagnosing, using your unique impact pattern on the driver face to calibrate the perfect tee height for maximizing distance and achieving a powerful, consistent launch.
We’ve all been there: a smooth, powerful swing that feels perfect off the hands, only to look up and see the ball ballooning straight into the air. The dreaded « sky ball » or « pop-up » is one of golf’s great frustrations, a testament to energy wasted. Conversely, a thin shot that never gets airborne feels just as dissatisfying. For years, the common advice has been a simple mantra: « tee it high and let it fly. » While there’s truth to this, it’s an incomplete picture. Many golfers follow this rule blindly without understanding the critical relationship between tee height, the club’s angle of attack, and, most importantly, where the ball makes contact with the driver’s face.
The real secret isn’t a fixed rule, but a personalized process of calibration. The optimal tee height is not just about getting the ball « up, » it’s about aligning the ball with the precise spot on the clubface that maximizes your unique swing dynamics. This involves understanding the physics of launch, but also embracing a diagnostic approach. Instead of guessing, you need a system to measure your impact location and then adjust the tee accordingly. This article moves beyond the old adages and provides a modern, data-driven framework. We will explore the « why » behind tee height’s influence, give you a precise method for finding your impact pattern, and equip you with the knowledge to make consistent, powerful contact the new standard for your game off the tee.
In this comprehensive guide, we’ll deconstruct every element related to teeing the ball, from the physics of the driver swing to the subtle details of equipment that can make all the difference. Get ready to transform your tee shots from a source of anxiety to a position of strength.
Summary: Finding Your Optimal Driver Tee Height: A Guide to Launch and Impact
- Why Does Teeing It High Promote an Upward Angle of Attack?
- How to Mark Your Tees to Ensure Consistent Height Every Time?
- Bamboo or Plastic: Which Tee Material Damages Mower Blades Less?
- The Teeing Mistake That Reduces Spin on Iron Shots
- How to Tee the Ball Low to Hit a Wind-Cheating Stinger?
- How to Use Foot Spray to Locate Your Impact Pattern on the Driver Face?
- The Setup Error That Causes Chunked Shots on Manicured Turf
- How to Size a Golf Glove to Prevent Blisters and Excess Movement?
Why Does Teeing It High Promote an Upward Angle of Attack?
The advice to « tee it high and let it fly » is rooted in the physics of maximizing distance with a modern driver. To achieve a high launch with low spin—the holy grail of driving—the clubhead must strike the ball on an upward trajectory. This is known as a positive angle of attack (AoA). Teeing the ball higher facilitates this upward strike because it gives the driver head more room to complete its arc and begin its ascent before making contact. Think of the swing as a circle; the lowest point of the circle occurs a few inches behind the ball. By teeing it high, you position the ball further along the upward curve of that circle.
When the driver strikes the ball with a positive AoA, it imparts less backspin. This is crucial because excessive spin creates lift, causing the ball to « balloon » and sacrifice carry distance. A higher tee position encourages you to stay behind the ball and sweep up, naturally increasing your AoA and reducing spin. This combination of a higher launch angle and lower spin rate is what produces the powerful, penetrating ball flight that all golfers seek. It’s not just a feeling; it’s a measurable advantage.
The performance gains are significant and have been repeatedly verified. For example, Golf Digest’s comprehensive testing reveals that golfers saw an 11-yard increase in carry distance when using a high tee versus a low tee. This isn’t about swinging harder; it’s about optimizing the launch parameters by using tee height as a tool to improve the club’s delivery into the ball. The higher tee simply puts the ball in the ideal window for the club to do its job effectively.
How to Mark Your Tees to Ensure Consistent Height Every Time?
Understanding the « why » of tee height is only half the battle. If you can’t repeat your optimal height every single time, you’re reintroducing guesswork into the equation. The key to eliminating this variable is to create a simple, repeatable measuring system. One of the most effective and low-tech methods is to use your own hand and a permanent marker. By creating a visual cue on your tees, you can guarantee the exact same height on the first tee, the 18th, and every one in between.
This process starts by finding your ideal tee height during a practice session (a process we’ll detail later with foot spray). Once you’ve found the height that produces your best strikes, place the tee in the ground and use your index finger as a guide. Note where the top of the grass or mat aligns with a specific knuckle or crease on your finger. This becomes your personal measurement. Now, take a permanent marker and draw a line on your tees at that exact spot. This simple line removes all ambiguity. Every time you tee up, you just push the tee into the ground until the line is flush with the turf.
This system of calibration turns an abstract concept into a concrete action. It might seem overly meticulous, but professional golfers and elite amateurs obsess over these details because they know consistency is built on a foundation of repeatable processes. By marking your tees, you remove a significant variable, allowing you to focus on your swing, confident that the ball is positioned perfectly. This method is far more reliable than eyeballing the classic « half a ball above the crown » rule, which can vary wildly depending on your perspective and the lie of the land.
Bamboo or Plastic: Which Tee Material Damages Mower Blades Less?
While a golfer’s primary concern is performance, a secondary consideration that speaks to good course etiquette is the tee itself. The debate between traditional wood or bamboo tees and modern plastic tees often revolves around durability and feel, but their impact on course maintenance is a significant factor. Golf course superintendents and their crews face the constant challenge of maintaining pristine playing surfaces, and broken tees are a major nuisance. When a mower runs over a broken tee, the material can have a direct impact on the expensive and finely-calibrated blades.
Generally, hard plastic tees, while more durable for the golfer, can be problematic. They don’t splinter as easily as wood, but when they do break, they can create sharp, rigid fragments that can nick or dull mower blades. Bamboo or wood tees, on the other hand, tend to shatter into smaller, softer pieces. However, the sharp splinters from a broken wooden tee can also pose a risk. A new generation of biodegradable polymer tees offers a compromise, designed to break down without harming mowers or the environment, though they often come at a higher cost.
The following table, based on information from course maintenance experts, breaks down the key differences.
| Material | Mower Impact | Environmental Impact | Durability | Cost per Round |
|---|---|---|---|---|
| Bamboo/Wood | High risk – sharp splinters damage blades | Biodegradable | Single use | $0.10-0.20 |
| Plastic | Lower risk – softer material | Non-biodegradable | Multiple uses | $0.05-0.15 |
Ultimately, the choice of material is less important than the golfer’s actions. As the leading authority on course care, the Golf Course Superintendents Association offers a clear directive on this matter. Their guidance prioritizes the player’s responsibility above all else.
The most important factor is for the player to pick up their broken tee. Frame this as a sign of respect for the course, the maintenance staff, and fellow golfers.
– Golf Course Superintendents Association, Course Maintenance Best Practices Guide 2024
Regardless of whether you choose wood, plastic, or bamboo, the single best practice is to pick up your tee—whole or broken—after your shot. This simple act of courtesy does more to protect the course and its equipment than any material choice ever could.
The Teeing Mistake That Reduces Spin on Iron Shots
While a high tee is beneficial for the driver, applying the same logic to iron shots is a critical mistake that sabotages control and consistency. Irons are designed to be struck with a downward angle of attack, compressing the ball against the clubface to generate the spin needed to hold a green. When an iron shot is played from a tee on a par 3, the goal is not to sweep it off the peg like a driver, but to replicate the same turf interaction you’d have from the fairway. Teeing the ball too high is the most common error in this situation.
Teeing an iron too high encourages a sweeping or even an upward strike. This « picks » the ball cleanly off the tee, which might feel pure but drastically reduces the compression and spin rate. The result is a high, floating shot with little control, one that is easily knocked down by the wind and will struggle to stop quickly upon landing. The ball might travel a similar distance, but its trajectory is weak and ineffective for precision approach shots. The contact feels hollow because the club’s design—to hit down and create spin—has been completely negated.
To maintain control, the tee should be pushed almost entirely into the ground. A good rule of thumb is to have the ball sitting no more than a centimeter off the turf. Golf instruction experts recommend a maximum height of 1cm for long to mid irons, and even less for short irons. The goal is to barely elevate the ball to ensure a perfect lie, not to change the fundamental mechanics of the iron swing. You should still feel like you are hitting slightly down on the ball, taking a small divot just after impact. This ensures proper compression and the high-spin trajectory that allows you to attack flags with confidence.
How to Tee the Ball Low to Hit a Wind-Cheating Stinger?
On a blustery day, the high-launching drive that works so well in calm conditions can become a liability. This is where mastering a specialty shot like the « stinger » becomes an invaluable asset. The stinger is a low, penetrating drive designed to bore through the wind, sacrificing some carry distance for maximum control and rollout. The primary setup adjustment to produce this shot is, unsurprisingly, the tee height. By teeing the ball significantly lower, you fundamentally change the launch conditions.
Teeing the ball low—often with only a third of the ball above the crown of the driver—forces you to alter your angle of attack. Instead of hitting up on the ball, this setup promotes a more level or even slightly downward strike. This de-lofts the clubface at impact, creating a much lower initial launch angle. Furthermore, this type of strike typically increases the spin rate compared to an optimal high-tee strike, which helps the ball maintain a stable, flat trajectory instead of climbing into the wind. It’s a deliberate trade-off: you accept less overall distance in perfect conditions for a more predictable and effective result in tough ones.
Executing a stinger involves more than just teeing it low. The entire setup must be adjusted to support this intention. The ball should be positioned slightly further back in your stance than a standard drive, typically just inside your lead heel. Additionally, placing your hands slightly ahead of the ball at address will further deloft the club. From there, the swing thought is to stay « on top » of the ball and deliver a firm, downward strike. It’s a controlled, compact swing, not a full-power lash. Mastering this shot gives you a crucial weapon against the elements.
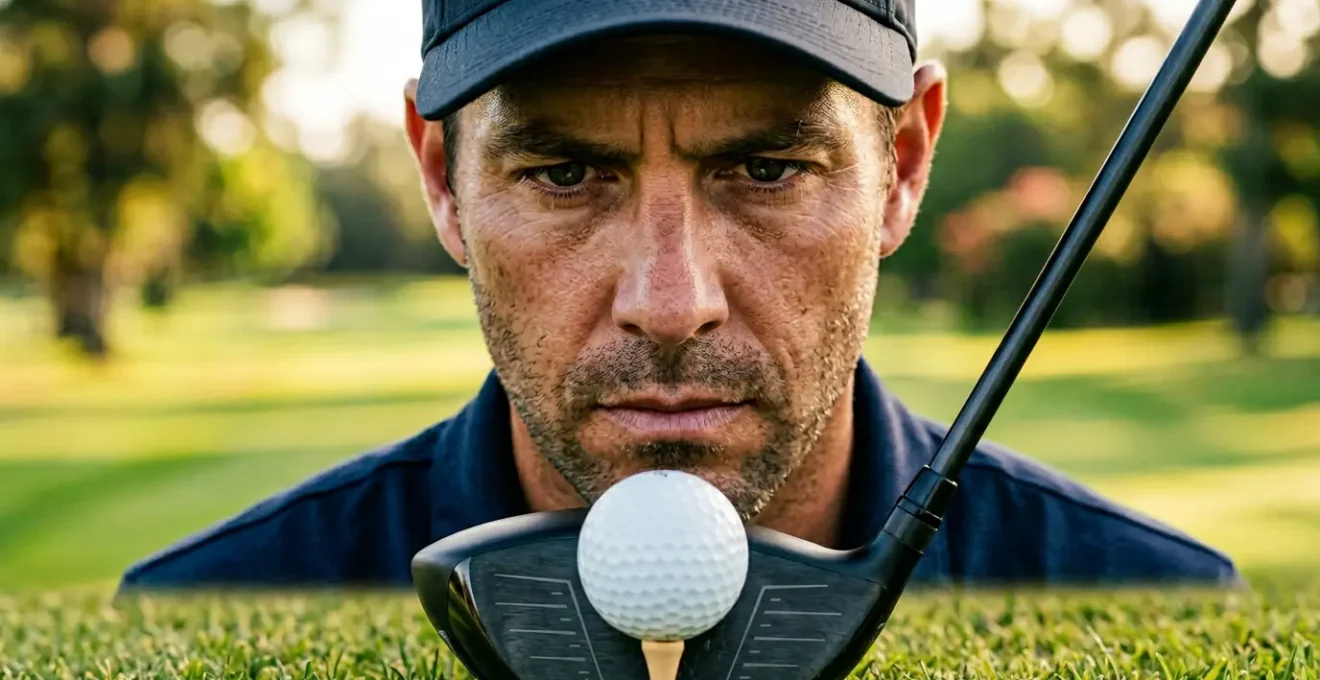
How to Use Foot Spray to Locate Your Impact Pattern on the Driver Face?
Just as we manipulate tee height for specialty shots, we must first establish our baseline. The single most effective way to transition from guessing to knowing your optimal tee height is to find out where you consistently strike the ball on the driver face. The sweet spot isn’t a large area, and even slight misses can dramatically affect distance and dispersion. While launch monitors provide this data, a simple, inexpensive can of foot spray (or specialized impact spray) can give you the same crucial feedback.
The process is simple. Apply a light, even coat of spray across the entire driver face and let it dry. The white, powdery surface will provide a perfect canvas. Then, hit a series of 5 to 10 balls using your normal, comfortable swing. After your series of shots, you will see a clear cluster of blue marks on the face, revealing your personal impact pattern. Are your shots clustered high on the face? Toward the heel? Or low and on the toe? This visual data is the starting point for all meaningful adjustments. It replaces subjective feel with objective fact.
Once you’ve identified your impact location, you can start calibrating your tee height. If your impacts are consistently low on the face or on the bottom grooves, your tee is likely too low. If you see marks high on the face or even on the top edge of the crown (a « sky mark »), your tee is too high. The goal is to use tee height to move that impact pattern into the optimal zone: slightly above the center of the face. This is where modern drivers are engineered for maximum ball speed and forgiveness. This diagnostic process turns tee height into a precision tool.
Your Action Plan: Impact Pattern Diagnosis
- Apply a thin, even coat of athlete’s foot spray to the driver face and let it dry for 10 seconds.
- Hit 5-7 balls with your normal, stock driver swing to create a clear impact cluster.
- Photograph the face to document the location of your impact pattern for analysis.
- Analyze the cluster: Is it centered, or biased towards the heel, toe, top, or bottom of the face?
- Adjust your tee height and stance to move the pattern toward the center or slightly high-center of the face.
According to feedback from golf instructors, you can typically see 8-10 shots clearly with a single spray application, making this an efficient way to gather data during a range session.
The Setup Error That Causes Chunked Shots on Manicured Turf
One of the most frustrating and mysterious mishits in golf is the « chunked » iron shot, where the club hits the ground significantly behind the ball. While there can be many causes, a surprisingly common one is a subconscious holdover from the driver swing. Golfers are correctly taught to « stay behind the ball » and hit up with their driver. However, when this feeling bleeds into their iron play, it can be disastrous. This « driver swing contamination » causes the low point of the iron swing to shift too far back, resulting in heavy or chunked contact.
This setup error is particularly prevalent on pristine, tightly mown fairways or tee boxes where there is no margin for error. With a driver, your weight is typically split 50/50 or even slightly on your trail foot to encourage an upward strike. If you adopt this same weight distribution with an iron, your swing’s low point will almost certainly be behind the ball. For a proper iron strike, your weight should favor your lead foot (around 55/45 or even 60/40), and your sternum should be positioned slightly ahead of the ball. This setup promotes the crucial downward angle of attack necessary to compress the ball and take a divot after impact.
Case Study: The Driver Swing Contamination Theory
Many golfers who perfect an upward angle of attack with their driver inadvertently apply the same « stay behind it » swing thought to their irons. This shifts their weight back and moves the swing’s low point behind the ball, leading to consistent chunks. A powerful drill to fix this is to place a headcover or towel one foot behind the golf ball. If you are chunking your shots due to this fault, you will hit the headcover. This provides immediate, undeniable feedback, forcing you to shift your low point forward to miss the obstacle and strike the ball first.
Expert biomechanics analysts agree that subtle setup flaws are often the root cause. An overly wide stance or placing the ball too far forward with an iron—both common traits of a driver setup—can also shift the low point back and predispose a player to chunked shots. Recognizing the distinct setup requirements for drivers versus irons is fundamental to clean ball-striking.
Key Takeaways
- Optimal tee height is not a universal rule but a personal setting based on your unique impact location.
- Use foot spray to diagnose your impact pattern; adjust tee height to move the pattern to the center or high-center of the driver face.
- Teeing high promotes an upward angle of attack for more distance, while teeing low is a tool for control in windy conditions.
How to Size a Golf Glove to Prevent Blisters and Excess Movement?
After dialing in your swing mechanics and tee height, the last thing you want is for your performance to be undermined by ill-fitting equipment. The golf glove is your only point of contact with the club, and an improper fit can lead to everything from blisters to a loss of control at the top of the swing. Many golfers make the mistake of choosing a glove that is too large, believing it will be more comfortable. In reality, any excess material or bagginess is a major liability.
A properly sized golf glove should fit like a second skin. There should be no extra material at the tips of your fingers—a good test is to check for no more than a quarter-inch of space. When you make a fist, the leather or synthetic material on your palm should not bunch or wrinkle. If it does, the glove is too big. This excess material can cause the grip to slip in your hands during the swing, forcing you to apply more grip pressure, which kills speed and creates tension. This slipping is also a primary cause of blisters and calluses.
When fastening the Velcro tab, you shouldn’t have to pull it all the way across. There should be about a quarter-inch of Velcro still showing, which allows for slight adjustments and stretching during play. The material of the glove also plays a role in fitting. A premium Cabretta leather glove should be bought extra snug, as the soft leather will stretch and mold to your hand over a round or two. In contrast, a synthetic or hybrid glove will not stretch as much, so it should fit perfectly right from the start. Taking the time to find a one-to-one fit is a small detail that pays huge dividends in feel, confidence, and club control.
The difference in material is not just about fit, but also performance. For players who prioritize feel, the data is clear. In fact, professional equipment studies show that 100% Cabretta leather gloves are consistently rated highest for both feel and grip performance by tour professionals.
Now that you are equipped with a systematic approach to finding your optimal tee height and refining your equipment, the next logical step is to apply this diagnostic mindset to every part of your game. Stop guessing and start measuring to unlock your true potential.